Measuring Trees
How to measure trees for inclusion in the Tree Register
"Why measure trees?"
To see how big they are and find the largest and tallest specimens of what are the biggest living things on our planet.
Studying a species at the extremes of its range teaches us much more than those that are average.
However, more scientific study to assess growth rates, age and survival come secondary to the excitement and thrill at finding a tree you have just measured is the largest of its species.
To ensure we can accurately compare trees to identify champion trees the following guidelines are provided to assist the intrepid big tree hunter.
- Measuring the Girth of a Tree.
- Tree Measuring Growth Categories.
- Measuring the Height of a Tree.
Measuring Girth:
- While a tree is alive it must increase in girth annually.
- On young vigorous species this difference can clearly be recorded every year.
- Larger old trees are best remeasured every 5-10 years.
- If the measurement you obtain is less than a previous measurement for the same tree, there will have been an error in either, a.) converting past figures from imperial to metric b.) a damaged tape has been used at sometime, c.) the measurement was not previously recorded at the stated height, or d.) the tree has since been damaged.
Golden Rules:
- Always measure at 1.5m (5 ft) from ground level on the upper side of any slope.
If the tree forks or abnorrnaly swells at or below 1.5m, then the smallest measurement below 1.5m should be recorded and the height from ground noted.
A 1.5m long stick is useful to stand upright next to a tree for accuracy and handy to gain access through bracken or nettles! - Always make sure the tape is level.
Never presume the first attempt is correct, slide the tape around the tree a couple of times to obtain the smallest measurement. - If possible always use a metric tape.
Periodically check your tape in case it has stretched or is damaged
Fig. 1.
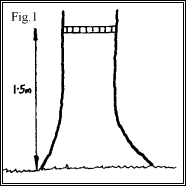
- Always measure at 1.5m from ground level.
- Diameter at Breast Height (DBH) is often quoted by foresters, however DBH is technically 1.3m from ground level.
- (On a fast tapered or burred tree, 20cm lower down the trunk can make quite a difference).
Fig. 2.
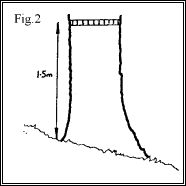
- Always measure on the upper side of any slope or the highest part of ground if uneven.
- Make a note if there appears to be unusual ground disturbance which may artificially have raised soil levels or if erosion has taken place.
Fig. 3.
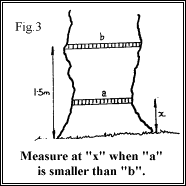
- Where burrs or swellings are evident at 1.5m, put the tape round the stem at various points below 1.5m to obtain the smallest measurement.
- If in doubt record several measurements at various heights such as at 0.3m, 1m and 1.5m.
- Even with a tree which appears to taper evenly from ground upwards, take time to check a couple of girths below 1.5m as sometimes the shape can be deceptive.
A tree which is completely burred on its main stem exaggerating any measurement, should be noted as such.
Fig. 4.
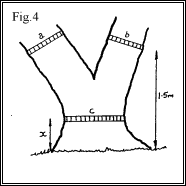
- If a tree forks at or below 1.5m the measurement is recorded at the narrowest part of the main stem below the fork and the height of the forking noted. e.g. 1.24m girth @ 0.3m (Forks @ 1m).
- Alternatively the two or more stems could also be recorded at 1.5m.
e.g. 45cm + 34cm girth @ 1.5m and 1.24m girth @ 0.3m.
Fig. 5.
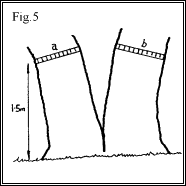
- A tree which breaks into two or more stems at or near ground level should be recorded in a similar manner to that in Dia. 4.
- If the tree has multiple stems the largest stems should be recorded and additional stems indicated by use of a + sign. e.g. 34cm + 29cm girth @ 1.5m + + +.
- If the stems clearly come from a much older coppice stool please record this fact as well.
Fig. 6.
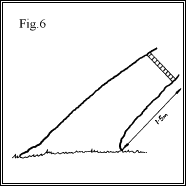
- A leaning tree should always be recorded on the lower or underneath side.
- Collapsed trees still growing can also be recorded in this fashion.
- Ensure that the tape is perpendicular and follow all the above points as if measuring a standing tree.
Diameter
- Diameter is currently used as the standard measurement by the British forest industry.
- Conversion from girth to diameter is obtained by dividing centimetres girth by 3.14159.
- Diameter can be recorded directly by using a foresters diameter girth tape.
- Please note whether your measurements are girth or diameter when submitting records.
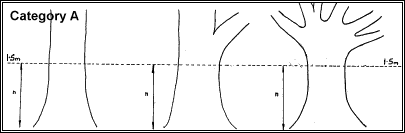
TREE MEASURING GROWTH CATEGORIES
(Measurements taken at "n")
Category A
- Trees growing with a clearly defined single clean stem measured at 1.5m.
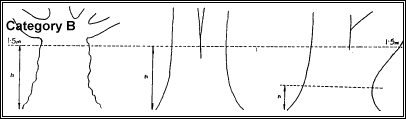
Category B
Trees growing with a clearly defined single stem which have:
- natural features that increase the measurement at 1.5m.
- to be measured at a height other than 1.5m.
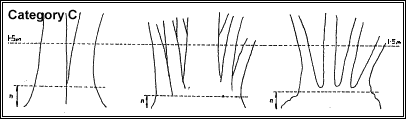
Category C
- Trees growing without a clearly defined single stem at ground level, as multiple stem or coppice:
- Where possible the largest individual stem is also recorded at 1.5m for comparison with an individual tree.
Tricky Trees
Difficult trees to measure that do not appear to conform to the descriptions of categories A, B or C.
MEASURING HEIGHT
Height can be measured to a fair degree of accuracy using simple methods.
Please refer to Collins Field Guide, Trees of Britain and Northern Europe by Alan Mitchell pages 26-27.
Instruments called Hypsometers and Clinometers can record height to a greater degree of accuracy, however, even these can be misleading if used incorrectly.
All instruments should be periodically checked for accuracy against an object of known height.
(This leaflet presumes that measurers are familiar with the use of either a simple or precision instrument).
Golden Rules
- Always measure height using as long a baseline (distance from tree) as possible.
Generally try to be at a distance as great as the height of the tree and preferably twice the height. The tip or top most branches must be clearly visible. Fig.1
Always measure height using as long a baseline - Always use a linear tape to measure your baseline from below the highest part of the tree.
This will often be the centre of the tree NOT the edge nearest you. Fig. 2. but may be some distance away. Fig.3.
Always use a linear tape to measure your baseline from below the highest part of the tree - Always stand on the same level of ground as the tree i.e. do not measure from up or down a slope but across the slope.
(To accurately record on a slope the angle of the slope has to be obtained and baseline ammended accordingly.) - If your vision is obstructed to the tip or top most branches of the tree either, take a different baseline or, estimate where the top is and record the height as estimated.
An estimated figure is denoted by enclosing it in brackets i.e. (30m) - Try not to measure a leaning tree on a baseline where the tree leans either towards or away from you, but record from the side to obtain a true height.
Alternatively, stand below the tip of a leaning tree and place a stick in the ground at that point.
Take your baseline from the stick. Fig 3
Take your baseline from the stick - If possible, always check a height using more than one baseline taken in different directions from the tree.
Always use more than one baseline to check the height if the tree is a champion! - If you obtain three or more different heights on different baselines it may be prudent to average the heights if different If there is a greater variation in heights than 2-3m critically analyse which measurements you consider to be the most accurate relating to, baseline distance, visibility, ground conditions and lean of tree.
Average those measurements you consider to be most accurate. - Trees growing in positions where it is awkward to obtain level baselines or provide good visibility will always be difficult to accurately measure.
Additional notes describing the distance and direction of baseline will provide a future reference to enable any increase or decrease in height to be recorded to a greater degree of accuracy. e.g. "25m baseline north of tree or "25m baseline toward house." - If a tree is dead in its upper crown or dying back, the height recorded should be to the highest live branch, although the height it had reached will be of interest if not recorded before.
- If a tree is regularly pollarded this should be noted and the height of the pollard also recorded.
Remember
Height can fluctuate throughout a trees life.
A tree may be damaged physically by storms or reduced by tree surgery.
It may then recover and continue to increase in height again.
Any such damage if seen should be noted.
If in doubt, always state the height as estimated